Sunday, November 29, 2009

Bread Crumbs


One of the hardest things about cooking and hosting a Thanksgiving dinner is trying to figure out what the heck to do with all those leftovers.  This year a sweet lady I know brought a bunch of rolls for dinner and there were a ton of leftovers.  She didn't want to bring them home since she lives alone, and they had sat out uncovered long enough to start getting stale so I knew the Peanut Gallery wasn't going to help me get rid of them.  I also hated the idea of throwing them away, so I starting thinking.  This is almost always dangerous territory.

Luckily for me, I remembered Barbara (yes, the same one you've been hearing about lately!) telling me not too long ago that she made her own whole wheat bread crumbs.  Hot diggity!  I had a plan.  Although I don't use a lot of bread crumbs around here, I do use them pretty regularly because I make spinach balls at least one a month for handsome man.  I also sometimes do baked chicken nuggets (now there's a recipe I need to post!) or a batch of stuffed  mushrooms which also call for bread crumbs, so they would most definitely not be going to waste.

The first thing I did was leave the rolls out overnight because I didn't have time to deal with them on Thursday.  By Friday afternoon, though, I was ready to speed the drying process along.  So I broke the rolls in half and spread them out on a cookie sheet.


Then I baked them in the oven on about 250 to 275 for a while, checking them every 20-30 minutes.  After a while, the outsides were feeling pretty dried and crusty.  That's when I started breaking them into smaller bits, like this:

If I was smart I would have probably started off this way, but oh, well!  Live and learn, I guess.

Once I was sure the leftovers were nice and dry all the way through (no soft centers, people - it's important!) I put them in a gallon-size ziplock bag.  Then I put that inside another one to make sure crumbs wouldn't be flying all over my kitchen.  That's when I got out one of my favorite kitchen tools... the meat mallet. 


I used the flat side (of course) to smash those babies to little bits.  Look at it this way: even if you'll never use the bread crumbs, this was a good exercise to help you deal with that pent-up frustration that no one helped you clean up after that huge dinner, right?  (And if you're not into the physical labor part of this activity, feel free to use your blender or food processor!)

Once you've got your bread crumbs, be sure to store them in an airtight container in the freezer.


Saturday, November 28, 2009

Sweet Basil Rub


What a crazy couple of weeks this has been!  I guess life starts getting crazy for most of us around mid-November and doesn't stop until January 1st.  Every year I swear it's going to be different and I won't get caught up in doing too much for the holidays, but every year new things come along and my plans are gone with the wind.  Despite the craziness, I love this time of year- don't you?  It's so festive and colorful and musical and joyful.  And it all starts with Thanksgiving.

Because I was traveling last week and had Thanksgiving this week, I haven't had that much time to blog.  However, I did have time to snap a few photos while doing my Thanksgiving cooking so that I could share a few ideas with you.

As late as the Wednesday night before Thanksgiving I still hadn't decided exactly how I was going to cook my first turkey the next day.  I had gotten great advice from many people, the most common of which was to use an oven bag.  Since I don't even own a turkey baster, I figured that would be a good idea.  But basting and oven bags aside, how was I going to season the silly bird?  Out of all the ideas I heard, the one that was the most appealing to me came about 8:00 Wednesday night from my lovely sister-in-law, Julie.  She had a recipe for a rub that she had gotten from a friend named Marci who thinks it may be a very (and I do mean very) old Butterball recipe.  Once I saw the recipe, I was sold.


Sweet Basil Rub
(I was cooking a 20 lb turkey so I decided to make a double-recipe so I could be generous and rub it inside and out.  I also made it the night before so the flavors could "marry" better - also a great idea!)

1 Tbsp salt
2 tsp sugar
1/4 tsp garlic pwder
1/4 tsp onion powder (or dehydrated onion flakes)
1/4 tsp paprika
1/2 tsp black pepper
1 Tbsp dried basil
1 1/2 tsp. lemon juice
2 Tbsp. olive oil

Combine dry ingredients in a small bowl and mix well.


Add lemon juice and olive oil and combine. If possible, let sit for several hours before using.


Apply liberally to raw meat or poultry before cooking.  Smell your hands before washing the basil rub off and try not to drool.  Yes, it smells that good.


Tuesday, November 24, 2009

Oven Roasted Chicken

OK, so I know, the bird looks a little spread-eagled in this picture.  But give me a break - it was my first real roasted chicken!  I actually decided to roast it today to practice for the Big Day on Thursday when I have to cook my first turkey.  If this is any indication what the turkey is going to be like, I can't wait!  This chicken is T-A-S-T-Y.

Not long ago Barbara (the same lovely lady whom you have to thank for the yummy Fajita Soup recipe) was also telling me how much she liked "roll over" meals.  You know, meals that have leftovers that can be used in the next meal, and so on and so forth. I love this idea!  This single chicken than I paid about a dollar a pound for (which came out to about $4.50) is going to take us through three meals this week.  Even though there's a million ideas you could use, here's what we're going to do:

Meal #1 - Roast chicken with vegetables on the side.
Meal #2 - Pull of the rest of the chicken from the carcass and use to make Creamy Chicken Taquitos
Meal #3 - Boil the carcass to make chicken stock and use that to make some soup.  Instructions and ideas on the soups to come later this week!

Even if you're a working mom or just don't have a lot of time for dinner prep on weekdays, roast the chicken on a weekend and prepare the rest for your weekdays meals.


Oven Roasted Chicken

1 whole chicken, giblets removed
Nature's Seasons seasoning blend  or Salt & Pepper
1 large stalk celery
5-6 cloves of garlic
1/2 large onion
5 Tbsp butter

Rinse thawed chicken, inside and out.  Make sure to remove all the giblets and the neck.  Place on a large cutting board with the legs up, like so:

 Gather your other ingredients, and if you haven't started preheating the oven yet, go ahead and turn it on to 350 degrees.

 Peel 2 large cloves of garlic.  Cut them in half and slide them under the skin on top of the chicken.

Sprinkle Natures Seasons all over the chicken.  Pour some into your hand and use it to rub the inside of the chicken as well.  (I filled my hand as shown and did it about 3 times.)

 Next peel and cut the remaining garlic cloves in half.  Cut the onion half into 2 pieces.  I also ended up cutting the celery in half again just to make it easier to get into the center cavity of the chicken.

Now stuff all those veggies in side.  I put in half the onion, half the garlic, half the celery, and the repeated.  I don't know that this really makes the flavors distribute more evenly, but it made me feel better.

 Next, cut up 2 tablespoons of your butter into 8 small cubes.  Stuff 4 under the skin on top next to the garlic, 2 in the rump opening and 2 in the neck opening of the chicken.

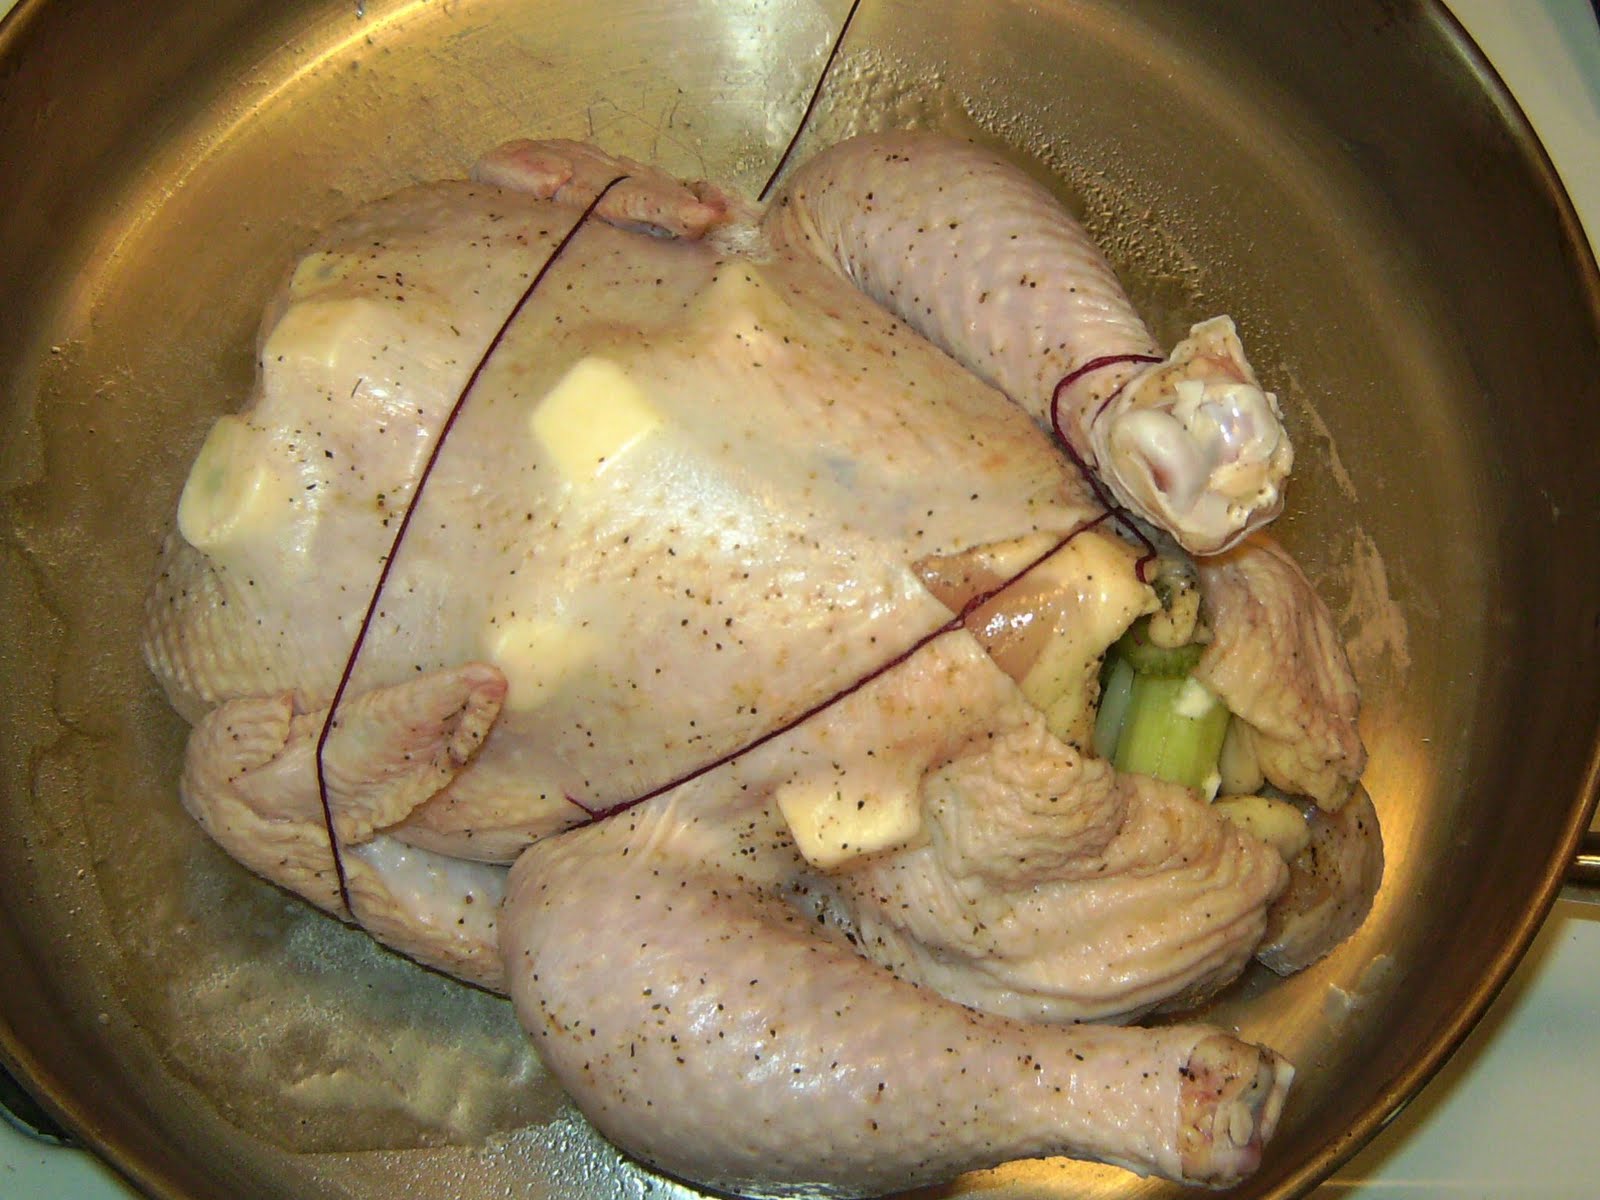
  Place the chicken in your roasting pan the same side up as before.  Now we're going to "truss" the chicken, which means to tie that baby up so it'll be less likely to dry out the legs or wings while baking.  I used about a 3 to 4-ft. long piece of cross-stitch thread, but any non-melting, thick string will work.  Start by typing one of of the string to the end of the right leg.

Next, wrap it around the chicken at an angle towards the left side and bring it under the back so it comes out where the wing is on the right.  Pass the string over the right wing, securing it to the body.  Bring the string straight across to left side, securing that wing as well by passing the string underneath the chicken again and bringing it out by the right wing.


Make sure the string has been pulled firm and the wings are now secured to the body of the chicken.  Cross it back over the top of the chicken and wrap it a couple of times around the left leg.


The last thing you need to do is secure the legs together.  I did this by wrapping the end of the string in a figure eight pattern around the two legs till the string ran out.  This saved me from having to tie another knot and made it easier to get off after the chicken was done cooking.

Now your chicken is trussed and ready for baking.  Before you pop it in the oven, cut three more pats of butter (about a tablespoon each) and place them on the pan close to the chicken.

Roast in the oven for about 20 minutes per pound.  Since I had a 4 1/2 pound bird, that means I roasted for 90 minutes.  There's no need to baste during cooking.  When the chicken comes out, baste with the melted butter and juices in the bottom of the pan.  Cover with foil and let it "rest" for 30 minutes before serving.  This is by far the hardest part of roasting a chicken because is smells so dang good.  Horse Lover was having a hard time waiting for a sample, so she set the timer so we wouldn't forget when it was finally ready.

 
 Finally, there are two things you should do before serving this chicken.  First, don't forget to cut off the string.  Second, I chose to cut out the garlic from under the skin.  If you really, REALLY like garlic you could skip this part, but I didn't want the kids taking a bite of it by accident.  They like garlic, but probably not that much.

All in all, it was a very successful venture on my part!  I'm thinking this is something I should do a couple of times a month.  Not only is it cheaper than just buying boneless skinless chicken breasts, the meat pulled of is juicy and moist, and the extras will make a great dinner later this week!


Thursday, November 19, 2009

Freedom

I'm going to go ahead and apologize now for the lack of pictures with this blog post.  Since I'm not an ace photographer, I know you're not here for the pictures, but still.  They add a little something, right?  Well, for those of you who don't know, I am currently about 1,200 miles from home helping a friend out with a her first new baby.  But since my last post was about getting back to basics, I didn't want to wait a whole week before posting again, so here I am!  And although I am recipe-less in this blog post as well, I hope you still find something worth reading about.

The best thing about being here is (other than getting to spend time with a good friend and playing with a new baby that doesn't keep me up at night) is the freedom of not browsing my kitchen for good things to eat.  The down side (other than keeping track of my 17-month old in a non-babyproofed house) is not having the freedom to browse the kitchen for good things to eat.  Make sense?  Just hear me out.

I have a love-hate relationship with my kitchen.  When I was a working mom this wasn't a huge deal because I primarily home in the evenings, and that's not when my snacking hour strikes. Since I'm a daytime snacker, I would have a few healthy snacks available at the office for me to choose from when hunger hit.  It was relatively easy to make a good choice when I only had three things to choose from, and none of them were chocolate.  As a SAHM, I have a whole kitchen of food to choose from!  If I don't see what I want, I can make what I want, right?  And seriously, how many of us don't know where the chocolate chips are kept?  It's so easy to opt for the sweet snack if it's on your list of choices.

As I have been traveling and thinking this week, I realized that if I am going to be successful with weight loss and healthy eating as a SAHM, I need to follow the same rules I had as a working mom.And one of the big ones I have not been following is that I'm not planning my snacks.  I know it sounds trite.  We've read the advice in every doctor's office magazine weight loss article known to man.  But just because it's trite doesn't mean it isn't true.  And amazingly, as I have been a guest in someone else's home, I have been doing just that.  I don't raid the pantry.  I have a few things that I picked up from the store to have as snacks, and guess what?  That's what I am having! And it's remarkable how free I feel.  The funny thing about rules made for our benefit (like the ones good parents give us or the Commandments) is that abiding by those rules doesn't limit us at all - it frees us to do the things that we really wanted to do all along anyway.

And so, here's my new snacking rules as a SAHM:

1. Plan and prepare snacks at night for at least the next day (preferably for the next couple of days).

2. Schedule times for the kitchen to be "open" and "closed" so I'm not constantly grazing.

3. Each snack should combine food groups to make them more filling (i.e. a small apple and 1 oz. cheese is more filling than a large apple alone!).

4. Each snack should be no more than 150 calories.

    With a little hard work and self control, I'll be back on the bandwagon in no time at all!

    Tuesday, November 17, 2009

    Back to Basics

    This past Sunday at church I was raving to some friends about the yumminess of some cinnamon twists that I had made for breakfast that day. One friend responded, "See, this is why I can't cook anything off your blog!" In other words, she was telling me that it's all too fattening. It startled me.

    Since then, I've been thinking about what she said. Although I have posted some lower-calorie recipes lately, she's right. A lot of what I've been posting are the "special something" that you want to make and have every once in a while - muffins, pies, cakes, even some of main dishes like the chicken pot pie. If I ate this stuff all the time I'd be as big as a house. Unfortunately for me, I have been making them a lot more often then usual. I can't blog about them if I don't have pictures, and I can't get pictures if I don't make the recipe, right?

    I realized that since I've started posting regularly on this blog this past summer, I stopped losing weight. In fact, not only did I stop losing, but I have gained about 10 pounds back. Huh? I am SO no into that. And all this time I've been telling myself that it is because I haven't started running again since summer vacation. Although exercise is a big factor in weight loss for me, a huge part of my weight loss will also be affected by what I am putting in my mouth. And since I have a big sugar addiction... there's no eating "just one bite" of anything sweet.

    And so, I am going back to basics. I realized that I have been too concerned with posting what is "yummy" instead of what is "good and nutritious" on this blog. "Yummy" implies sugar and fluff, not sustenance. Yet if I look back at my goals for this blog, they have more to do with feeding my family healthy food - not "yummy" food. And "good and nutritious" can be "yummy", too! It's just hard to realize that when you're trying to decide between a Pumpkin Chocolate Chip Muffin and a fresh apple. I don't need to clutter the blog with sweets and fat. There's plenty of those recipes out there to be found if you're looking for them.

    And so, though I will still do an occasional post on something sweet (in part because I've already got several recipes and pictures ready to go) or something full of carbohydrates (like bread and pizza), I'm going to focus on good, healthy dishes, utilizing lots of veggies. We are heading into the biggest weight-gaining season of the year, and the last thing any of us need are more ways to eat junk food.

    As an added bonus, my sister Gwen is going to start posting recipes on this blog with me. She is also on a journey to regain control of her eating habits and live a healthy lifestyle. Maybe by lending one another support we can all be successful.


    (Photo of fruits and vegetables courtesy of http://webpages.scu.edu/ftp/kryder/phealthy.html)

    Monday, November 16, 2009

    Roasted Potatoes

    Several months ago I had these fantastic roasted potatoes at a friend's house. Because I am the Candid Cook and lover of all things edible, I asked her for her recipe. I was floored when she said that all she used for seasoning was the Good Seasons Italian dressing mix packet. Another friend that was there said she used it to season everything, too. What?! How did I miss that memo?

    That's when I bought my first package. I even bought the starter kit that came with a shaker bottle and two packets of seasoning. I used it to make a marinade for chicken and veggie shish-ka-bobs, and I was hooked! Not only is it a cheaper and better way to make salad dressing, but as I had already been told, I could also use the seasoning packet to roast potatoes.

    One of my favorite things about this recipe is how stinkin' easy it is. You don't even have to peel the potatoes. You just scrub, chop, season, and bake. My second favorite thing about this recipe is that for the FIRST TIME (not counting french fries) Horse Lover has not only liked to eat potatoes, but she has asked me to make them. With the skins, no less. Do you hear the choirs of heavenly angels singing? I do!


    Roasted Potatoes

    4 Russet potatoes or 6 red potatoes
    1 package Good Seasons Italian dressing mix
    2 Tbsp. olive oil

    Scrub and chop potatoes into bite-size pieces. Add 1 packet of Italian dressing mix. Toss lightly to coat the potatoes. Drizzle a olive oil and toss again to coat.
    Line a 13x9-inch pan with aluminum foil. Coat with non-stick cooking spray. Pour potatoes into pan. What you see pictured here is only 2 russet potatoes (I made a half-batch!), so your pan should look a bit fuller than mine does.
    Bake at about 425 to 450 until potatoes are cooked through. Be sure and stir gently about half-way through. The length of time you need will vary based on how full your pan is and how large your potato dices are. I cooked mine about 30-35 minutes.

    Sunday, November 15, 2009

    Low-Fat Blender Waffles - Frozen?

    Sometimes you just need convenience food. The trick to keeping it healthy without breaking your budget is to fix it yourself, and then converting it to convenience food. Like frozen toaster waffles, for example. About a month ago I had a couple pears that needed to be used but weren't juicy enough for me to slice and eat with Handsome Man. Since no one else in the house will eat fresh pears, I decided to try them out in my waffles and the recipe for Pear Blender Waffles was born.

    Since then, I've been a little out of control. Because these waffles don't actually taste fruity, the kids love them. Because they're lower in fat and do have fruit in them, I love them. I have tried pears, apples, and frozen peaches in this recipe. And so no matter how hard I try I can't actually take the time to fix breakfast from scratch every day, I decided to make a double-batch of these every week and freeze the extra. They'll get the kids and I through about 3 days, which is great because I can plan on pulling them out on the crazy days.


    Low-fat Blender Waffles
    (Makes 8 to 10 Belgian-style waffles, about 100-110 calories each.)

    1 c. frozen peaches OR
    1 fresh peach, apple or pear, peeled and sliced
    1 c. milk
    1 egg
    1 Tbsp butter
    1 1/4 c. flour, white or whole wheat
    2 tsp. baking powder
    1/2 tsp. salt

    If you are using frozen peaches, thaw for about 30 seconds in the microwave before using. Otherwise, place prepared fruit in the blender. Add milk, egg, and butter.
    Blend for 30 to 60 seconds until fruit is completely mixed in.
    Add 1/2 cup only of the flour, along with salt and baking powder. This makes sure everything gets mixed in well. Blend until combined.
    Add remaining 3/4 cup flour and blend until combined. You may need to take off the lid and scrape the sides while it's running to make sure no flour clumps are left hanging on for dear life.
    Pour into a pre-heated waffle iron and cook according to waffle iron specifications.
    Hopefully your waffle iron will cook a little more evenly than my (brand new!) contraption...
    Serve for breakfast or freeze.
    To freeze, line a cookie sheet with wax paper and lay waffles out in a layer. If you still have waffles left, place another sheet of wax paper on top and make another layer. Repeat until all the waffles are laying flat between or on layers of wax paper.
    Stick in the freezer for about 2-3 hours. Once waffles are frozen, place into a Ziploc bag and store in the freezer until ready to use.

    To prepare frozen waffles:
    If you have the thicker Belgian-style waffle maker like I do, you will need to microwave them for a few seconds before toasting them. I usually microwave a plate of 4 waffles for 30 seconds or 2 waffles for 15 seconds. Then toast like you would the store-bought frozen waffles.

    Saturday, November 14, 2009

    Fajita Soup

    This recipe was given to me by one of my blog readers, former high school classmate, and new blogging buddy, Barbara. She has some great ideas in the kitchen, which I look forward to being able to share with you all.

    I also have two confessions to make. First, I have had this recipe since October 10th and am just now getting around to trying it. There's a couple ingredients in this soup that I don't normally keep around the house (Ro-tel tomatoes) and Bush's Chili Beans. I kept forgetting to add them to my grocery list. The second confession is that I never did remember the chili beans. I didn't have the recipe with me, and all I could think about were the Ro-tel tomatoes. So, I substituted a can of red kidney beans and added about a teaspoon of chili powder to the pot.

    Caution: This is a spicy soup. If you really aren't into spicy and you want to try this, I recommend subbing the Cilantro Lime Ro-tel tomatoes for the extra-mild. That way you still get the Mexican flavor without all the heat. If you like it just spicy enough to make your nose run (like me), than this is the perfect soup for you.


    Barbara's Fajita Soup

    2 cups cooked, shredded chicken
    1 can kidney beans, drained
    1 can black beans, drained
    1 can corn, drained
    1 can diced tomatoes
    1 can Rotel tomatoes (Mexican flavor with lime & cilantro)
    2 cups frozen peppers and onion mix
    1 packet fajita seasoning
    1 tsp. chili powder
    Extra water

    To get started, I assembled all my canned goods and seasonings.
    Then I dumped my canned beans into a colander in the sink. I don't all that thick juicy stuff in the canned beans, so I rinsed them well and added them to the crock pot.
    I also dumped in the corn (drained), both cans of tomatoes, the packet of fajita seasoning and the chili powder.
    Then I added my frozen bell pepper and onion mix and enough water to make a nice soup. I have a large crock pot, and I filled it about 2 inches shy of the rim.
    Lastly I added the cooked, shredded chicken and mixed it up nice.
    (Tip from Barbara: Buy the rotisserie chickens at the store when they go on sale at night. Pull the meat off and separate into 2 or 3 bags and freeze. Then you already have cooked, shredded chicken in the freezer and ready to use.)

    I actually started this in the crock about 10:00 in the morning, but I forgot to turn it on until about 12:00. It cooked about 5 1/2 hours on low and was still great for dinner! We served it with a dollop of light sour cream. The Honey also added a handful of shredded cheddar. It was fabulous, Barbara - thanks for sharing!

    Friday, November 13, 2009

    Fun Fridays: Low-fat Sub Rolls

    I love a good sub. Doesn't everybody? It's even one of those meals that everyone will eat without complaining. Amazing, but true. And I can't figure it out, really. I can make them a sandwich with the exact same toppings and they complain. I make them a sub and I'm "mom of the year". They don't even notice they're having sandwiches for dinner!

    This particular batch of sub rolls were made with all white flour because I had run out of wheat and hadn't gotten around to grinding more - much to the delight of the younger members of the Peanut Gallery. It can be made with a white-wheat mixture of flour as well, however I don't recommend whole wheat for this recipe. It doesn't have any oil in it, so the only fat comes from the egg yolk. They are really good the day they are made, decent the next day. Beyond that, they don't really keep all that well because they dry out more quickly. Not a problem for our household, because it's not like sub rolls actually last all that long around here.


    Low-fat Sub Rolls
    (Makes 6 sub rolls of 220 calories each)

    1 c. warm water
    2 tsp. active dry yeast (or 1 pkg)
    1 tsp. sugar or honey
    1 tsp. salt
    1 egg
    2 1/2 to 3 c. flour, white or white-wheat
    1 egg white
    1 Tbsp. cold water

    Combine warm water, yeast, and sugar in a medium bowl. Let sit for about 5-10 minutes to dissolve the yeast and give it a chance to start reacting with the sugar. It'll start to look all foamy, like this:
    Stir in salt, egg, and 1 1/2 cups of flour. Beat on medium for about 3 minutes. Stir or and knead in as much of the remaining flour as needed to make the dough elastic yet still soft. Knead the dough lightly and let it rest on a floured service for about 10 minutes.
    Roll dough out into a long rectangle, about 6 inches tall by 12 inches long. I had a hard time getting "rectangle" and ended up with more of an "oblong". Don't worry about it. Just make sure it's as tall as you want your sub rolls to be long.
    Using a pizza cutter, cut dough into strips about 2 inches wide. As you can see, I had to cut off two smaller strips on the end because of the whole "oblong" thing. I then shaped those smaller pieces into one sub roll, as you will see in later pictures.
    Place dough strips on a cookie sheet covered in parchment paper or sprayed with non-stick cooking spray. Cover and let rise about 40-45 minutes.
    Just before the bread dough is finished rising, whisk together one egg white and 1 Tbsp cold water with a fork.
    Brush this egg mixture on top of the sub rolls, and bake at 375 for about 20-25 minutes. (See the hand-shaped sub roll on the left? Not as pretty as the others, but it'll do!)
    Bake at 375 degrees for about 20-25 minutes until lightly browned. Let cool, then cut and make your subs!
    Blog Widget by LinkWithin