Showing posts with label Breakfast. Show all posts

Saturday, July 30, 2011

Let's Stick Together Breakfast Burrito

I love breakfast burritos.  I love the peppers, onion, tomato, eggs, sausage and cheese all rolled in to one big, soft tortilla.

I hate it when I'm eating my breakfast burrito and all the good stuff starts falling out when I take a bite.  I really don't like getting tomato or sausage in my lap.

The solution?  A "Let's Stick Together Breakfast Burrito".  Nothing falls out, everything stays in, and it's one yummy, fluffy breakfast!  (Though if you use salsa, it might still drip a little so be sure to eat over your plate.)

"Let's Stick Together" Breakfast Burrito
I haven't included amounts for this recipe because you'll want to make it to your taste, and the amounts will changed based on how many people you're cooking for.  You can leave stuff out, put other stuff in, etc.  The pictures show amounts that make one really large burrito.

Olive oil
Onion, diced
Pepper, diced
Minced garlic
Fresh tomato, diced
Breakfast sausage, cooked and crumbled
Eggs
Salt/Pepper to taste


Preheat a little olive oil in a skillet.  Add diced onion, peppers, and a little minced garlic.  Saute until onion starts to look translucent.

Add diced tomato and cooked sausage, and cook for another minute or two until they are heated through.


Meanwhile, beat your eggs with a fork and add a little salt/pepper to taste.

When the sausage and tomato are warm, add the egg to the skillet.  Lift the veggies to make sure the egg covers the bottom of the skillet.

After a couple of minutes, the egg on the bottom will be cooked; try to flip the egg mixture in sections to get the uncooked egg to the bottom of the pan.  Don't try to stir this, or you'll end up with a bunch of uncooked egg, which is just nasty.  Remember: FLIP!
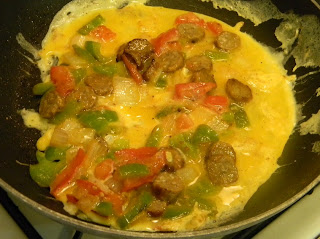
When it's done, it'll look something like this.

 Turn off the heat and let sit for another 3-5 minutes to finish cooking all the way.  If you're going to add cheese, now would be the time.  This way it melts onto the eggs so it won't fall out when you're eating.

Slap that concoction onto your tortilla and add a little salsa.  Wrap it up and enjoy every delicious, neat bite.

Need I say more?

Friday, May 14, 2010

Pancake Syrup

Do you ever have one of those nights where you get ready to start fixing dinner and realize that you probably shouldn't have put off going to the grocery store that day after all?  Today was that day for me. 

Here it is, Friday night.  I don't feel like thawing some chicken to cook, so what are my options?  I don't have enough cheese left for quesidillas, and the only thawed meat in I have in the house is some bacon.  However, it just so happens that this is some very excellent bacon given to me by a friend whose husband works for Hormel... okay, it's breakfast for dinner!

But wait!  I have exactly 4 eggs left in the house, so no scrambled eggs - what now?  I guess we're having pancakes.  So I put the bacon in the oven to bake and start the pancakes.  Just then I glance over at my kitchen sink area, which happens to be slightly cluttered.  Okay, okay - I confess!  It's a Disaster Area.  But my recycling is over there, rinsed and waiting to go out to the recycle bin.  And what do I see?  The syrup bottle that we finished earlier in the week.  Oh, great.  What now?  Do I send The Honey to the corner store to buy a bottle of syrup for $4?

Actually, there IS another option.  One nice thing about growing up poor with a mother that was born in the depression is that she made a lot of things that other people's parents bought.  Thousand Island salad dressing (nasty), mayonnaise (only once or twice), and yes!  Pancake Syrup.

My mother always made it with equal parts brown sugar, white sugar, and water.  She didn't use maple flavoring or any of those "fancy" things.  But I decided to experiment a little tonight.  Not with maple flavoring, however.  I already know the Peanut Gallery will not be impressed with that.  But how about a little butter and vanilla?

It's a gamble that paid off, let me tell you...


Pancake Syrup
(Yields 1 c. of syrup, enough for a small family.  If you plan on storing the extra or have a large family, you may want to double this!)

1/2 c. white sugar
1/2 c. packed brown sugar
1/2 c. water
1 Tbsp. butter
Splash of vanilla (1/2-1 tsp?)

In a medium or small saucepan, combine sugars.

Add water and stir.  Your mixture will look opaque because the sugar isn't dissolved yet.

Now you need to bring the mixture to a boil.  Turn the heat up on the stove to about medium-high, and be sure to stir constantly so it won't burn.  When you start seeing bubbles around the edge like the picture, you'll know you're starting to get close to the boil - but you are not there yet!

When you start to see it boiling more like this picture (note the bubbles in the middle of the pan), you can go ahead and set your timer for 7 minutes.  Whatever you do, do NOT stop stirring at this point.  This stirring can be a great job for your 9-year old if you're busy doing something else from time to time.

When the syrup starts getting foamy, turn the heat down to medium.  It'll keep boiling, trust me.

Finally, after about 7 minutes, remove the syrup from the heat.  It should look something like this.

Next add your square of butter and splash of vanilla.  Mix until melted and set aside to cool.  As the syrup cools it will thicken slightly.

Serve warm over pancakes or waffles.  Any leftovers can be stored in a sealed container (or old syrup bottle) either in the cabinet or the fridge.


Tuesday, October 13, 2009

Pear Blender Waffles

I have recently renewed my efforts to cut back our grocery budget. Again. Every so often I realize that I have fallen back into the habit of buying certain convenience foods, and I have to make an effort to shift gears. This time I realized that I could do much better with breakfast: I have now sworn off most cold cereals and frozen waffles!

The Honey is a die-hard cereal eater during the week, and he is gone and out the door by 7:00 a.m. anyway, so I don't even bother trying to fix him something for breakfast every day. But Horse Lover and The Monkey don't have to be to school until 9am and we live just 3 blocks away. I've got plenty of time for making breakfast, so there's no excuses. Of course, if the girls want cereal they can have some of his Frosted Miniwheats or Honey Nut Cheerios (generic, of course). But generally they are just stuck with what I'm fixing for breakfast.

I recently purchased waffle iron to replace the one that broke in our move to Oklahoma. We've been living without for a year. The problem I have with a lot of waffle and pancake recipes is the amount of oil that is used. It adds to the overall fat and calories of the meals, and it's really just unnecessary. You have to use some fat so the waffles won't stick, but in general you can cut back on the oil in a pancake or waffle recipe by adding some sort of fruit puree, like applesauce. So I took the "Basic Waffle Recipe" that came with my waffle maker and made some adjustments.

An added bonus for this recipe is that you make it entirely in the blender - so much easier to cook and clean up!


Pear Blender Waffles
(Makes about 8 Belgian-style waffles of 120 calories each.)

1 fresh pear
1 cup milk
1 egg
1 Tbsp real butter (not the spreadable type!)
3/4 c. whole wheat flour
3/4 c. white flour
1/2 tsp. salt
2 tsp. baking soda

Peel and core pear.

In a blender, combine milk, egg, butter, and pear. (I cut each half of my pear into about 4-5 pieces before putting into the blender.)

Blend for a full minute.

Add flour, salt, and baking powder. Blend another minute. Be sure to scrape the sides to make sure all of the flour gets combined.

Pour into a preheated waffle iron and cook!

Tip: If you are a big fan of the convenience of toaster waffles, you can freeze these and reheat in the toaster. Just lay flat on a cookie sheet and pop in the freezer for about an hour. Once they are firm, you can bag them up and store them.

Wednesday, September 30, 2009

Almond Granola

Before we get started, let me remind you that granola is not diet food. It is not low in calories, and it's really not all that low in fat, even though the fats in this recipe are good fats. I will probably play with and tweak a granola recipe to get something that somewhat lower-calorie than this one, but I was craving granola with almonds and coconut. That's about half the calories of this recipe in just those two items! That having been said, don't pig out on this stuff.

Because I like to sprinkle granola in my yogurt I didn't make this with any dried fruit, such as raisins. However, if I'm having a bowl of granola with milk on it, I do like to add 1-2 tablespoons of dried cranberries or raisins for flavor and that extra little something that fruit adds to a good bowl of granola.


Almond Granola
(305 calories per 3/4 c. serving. Recipe makes 6 cups/8 servings.)

3 cups rolled oats
1 cup sliced almonds
1/4 c. wheat germ or milled flax seed
1 c. flaked coconut
1/4 c. canola or olive oil
1/4 c. honey
1 Tbsp molasses

Combine oatmeal, almonds, wheat germ/flax seed, and coconut in a large bowl. Mix well.
In a liquid measuring cup, combine honey, oil, and molasses. Mix as much as possible.

Drizzle about half of the oil mixture on top of the oatmeal mixture and mix until you've coated as much of the oatmeal as possible. Drizzle the rest and repeat. By the time you've got it all drizzled on and mixed, all of the oatmeal mixture should have a light coating of the oil mixture.
Spray a baking sheet with cooking spray. Spread the uncooked granola on the sheet as evenly as possible.
Bake in a preheated oven at 250 for about 1 hour and 15 minutes, stirring about every 15 minutes or so. Remove from oven and let cool. Store at room temperature in a sealed plastic container.

Thursday, September 24, 2009

Cinnamon Biscuits

My kids have been begging for my cinnamon rolls lately. Unfortunately, since we've moved I haven't had the focus or foresight to make my usual fare since it requires making yeast bread. So a couple of nights ago I finally broke down and decided to make breakfast for dinner with a side of no-yeast cinnamon rolls. I found a recipe online that I could use as a starting point. After making it, I realized that most no-rise cinnamon rolls recipes are really nothing more than cinnamon biscuits. I can live with that, but they won't replace my yeast cinnamon rolls any time soon. Here's the recipe with my changes.


Cinnamon Biscuits
(I didn't count the calories on this one, folks. In situations like these, I just know they are going to be high so I make a point of not eating too many!)

Dough

3 c. flour (white, wheat, or a mixture)
4 tsp. baking powder
1 tsp. salt
1/2 tsp. baking soda
6 Tbsp. butter or margarine
1 1/4 c. milk

Filling
2 Tbsp. butter
1/3 c. packed brown sugar
2 tsp. cinnamon

Icing
2 c. powdered sugar
Milk


In a large mixing bowl, combine flour (I used 2 c. wheat, 1 c. white), baking soda, salt, and soda. Cut butter into cubes and add to bowl.


Using your hands, work the butter into the flour mixture until it resembles coarse crumbs.


Add milk and stir as much as you can with a spoon.


Dump mixture out on a floured surface and knead it together until completely combined.


Roll out dough into a large rectangle. If sides are too rounded, fold them in to make a straight edge and roll flat again.


When you've got a large rectangle (about 10x16 inches), melt your butter in the microwave for about 20 seconds. In a separate bowl, combine brown sugar and cinnamon.


Spread melted butter out on the dough, and sprinkle with cinnamon mixture, getting as close to the edges as you can.


Roll the dough into a tube for slicing. Using a ruler, score the top of the roll at inch-intervals so you know where to slice. Then, taking a piece of thin string or dental floss, cut off the cinnamon biscuits by wrapping the string around the tube and pulling it tight.


Place cinnamon biscuits on a cookie sheet covered in parchment paper.


Bake in a preheated oven at 350 degrees for about 20 minutes. While baking, prepare your icing by placing the powdered sugar in a bowl and adding milk, a tablespoon at a time, until icing has reached desired consistency. Ice cinnamon biscuits while still warm.

Wednesday, September 9, 2009

Cinnamon Coffee Cake

I love cinnamon. Probably more than I should. I'm sure fresh cinnamon has some health benefits, but when it's baked into cinnamon rolls or coffee cake I'm sure the health benefits are outweighed by the the fat and sugar calories I am consuming. However, I will not be denied. I love cinnamon.

I've noticed lately that our Sunday morning breakfasts have fallen into a routine of sorts. If I have enough energy to plan ahead, The Monkey and Horse Lover always want me to make cinnamon rolls, though they have since told me they prefer it with regular white icing instead of the chocolate. If I don't have the energy (as has been the case through this move), then they ask for either Coffee Cake, pancakes, or waffles.

My mother would often make Cowboy Coffee Cake for us when I was younger. We loved it. It had a crumbly streusel topping and was just delicious. She got the recipe from the Better Homes and Gardens cookbook. In the 11th Edition that I have, they actually call it Buttermilk Coffee Cake, but since I don't use buttermilk and vary the recipe to have more cinnamon in it anyway... we'll just call it Cinnamon Coffee Cake. Also, I halved the recipe. A 9x13 pan full of coffee cake might be great for a family with six kids, but for my family of 2 kids and a baby? Umm... no.

Cinnamon Coffee Cake

2/3 c. milk
2 tsp. vinegar or lemon juice
1 1/4 c. whole wheat or white flour
3/4 c. packed brown sugar
1/2 tsp. cinnamon
1/4 tsp. salt
1/3 c. butter or shortening
1 tsp. baking powder
1/4 tsp. baking soda
1/2 tsp. cinnamon (yes, another 1/2 tsp!)
1/4 tsp. ground nutmeg
1 egg


In a small measuring cup, pour 2/3 c. milk. Add lemon juice or vinegar and set aside. (It will curdle into sour milk while you're mixing the other ingredients.)

In a medium mixing bowl, combine flour, brown sugar, cinnamon and salt. Mix well.
Add shortening or butter, and crumble together. Although you can use a pastry cutter, the easiest way to do this is with your hands. Cover the butter or shortening with some of the flour mixture and squeeze it.
Repeat this over and over, crumbling between your fingers until the butter or shortening is crumbled in evenly with the flour mixture.
Now, set aside 1/4 cup of the crumbled mixture. (This will be your streusel topping for later.) To the remaining flour mixture, add it baking powder, soda, cinnamon, and nutmeg. Stir well and set aside.

Go back to your milk. It should be slightly curdled by now. Add an egg to it and beat well with a fork.

Dump this into your dry mixture and mix thoroughly.
Spray a large casserole dish or small baking pan with cooking spray. (You're looking for something that would be about 1/2 the size of a 9x13 inch pan, remember!) Pour batter into prepared pan.
Sprinkle with that streusel topping that you set aside.
Bake in an oven preheated to 350 for about 35 minutes, or until a toothpick inserted near the center comes out clean.
Blog Widget by LinkWithin