Showing posts with label Side Dishes. Show all posts

Monday, August 15, 2011

Scattered Hash Browns

One of my favorite things in the world when I was in college was Waffle House hash browns - scattered, covered, chunked and diced.  And if you don't know what I mean, you are obviously a Yankee not from around these parts.

The funny thing is. I'm a Yankee, too.  In my case I was transplanted young and grew up liking some of those things that southerners do.  Like Waffle House hash browns, for example.

So anyway, I have recently realized I have a plethora of potatoes in my cupboard.  I'm part of a produce co-op and get potatoes regularly, but I haven't been using them.  For one thing, my kids don't usually like potatoes, and for another, it's been too hot to actually cook.  Last night I decided it was time to use up some of my spuds.  Since I was cooking 2 other things for dinner that my kiddos don't like (beef and broccoli), I tried to think of a way to prepare them that my kids would like.  I really do try to have at least one thing on the table that they will eat.  And you know what?  We had success!  And it wasn't actually that hard, OR that greasy.

One more thing before I get started.  I highly recommend using an electric griddle to make these.  You can do a smaller amount in a non-stick frying pan, but I found it much, much easier to do this on the non-stick, electric griddle.


Scattered Hash Browns

5 smallish russet potatoes
1 onion
olive oil
salt/pepper to taste

Wash and trim your potatoes.  Do not peel.

Grate the potatoes and onion, and place in a colander.  (Forgot to get a picture of this step, but I'm sure you can figure it out!)  Place in the sink and rinse with cool water.

 Cover a cookie sheet with paper towels, and spread the hash browns evenly.  Blot dry using another paper towel on top.

 Sprinkle the hash browns with salt/pepper, and drizzle with olive oil.  Toss together to mix lightly.

Spread the hash browns in a thin layer on a pre-heated electric skillet.  I set mine on 350, and also sprayed it with non-stick cooking spray - just for good measure.

 When the hash browns start looking crispy on the bottom, go ahead and flip.

You'll need to do this a couple more times until the hash browns finish cooking.  If they aren't getting crispy enough for your taste, go back and drizzle a little more olive oil over the potatoes.

Eventually you'll end up with a little piece of heaven that looks like this:

And even though I didn't cover, chunk or dice them (remember the picky kids...), we all thought they were delicious.  This is definitely going to get a repeat performance in this house.

So how do you like your hash browns?


Tuesday, May 11, 2010

Avocado-Lime Pico De Gallo

It's almost embarrassing that it has been a month since my last post.  I don't know how the time gets away from me!  Actually, I do.  I used to blog at night after my kids went to bed.  Lately I've been walking with my neighbor and my dog most nights around 8:30, and since I'm pregnant and tired, I'm in bed by 10:00.  It's a severe strain on my blogging time, let me tell you!

I know I promised you a bread recipe next (for those of you who DID save your potato water from those garlic mashed potatoes), but I'm going to break that promise for two good reasons.  First, it's been hot around here lately, and I don't know about you but when it's hot outside the last thing I feel like doing is turning on my oven for any reason.  But second, and even more important is that this stuff tastes so freakin' good that I couldn't wait another minute to blog about it.  I ate the first batch I made for lunch today with some tortilla chips - the whole batch!  I didn't even wait for the flavors to blend in the fridge first.  To hide my crime I had to make an additional batch to have with our tacos tomorrow night.  Shame on me, but it tasted oh so good!


Avocado Lime Pico De Gallo

1 can diced tomatoes
3 green onions
40-50 leaves of cilantro (about 6 or 7 sprigs)
1 1/2 jalapeno peppers
1/2 tsp garlic powder
1/4 tsp salt
1 Tbsp lime juice
1 avocado

Who would have thought that these simple ingredients could bring such pleasure?

Open the tomatoes and dump them into a strainer in the sink.  DO NOT RINSE WITH WATER.  However, you do want to get the extra juiciness out as much as possible, so shake your strainer just a bit.  As you can see, you'll have some tomato-juice-splatters to clean up later.

Next, let's pour those tomatoes gently onto a cutting board.

I like my tomatoes chopped a little smaller than the can of regular diced tomatoes has them.  One solution for this is to use petite diced tomatoes, but I didn't have any on hand today.  So I opted to just chop them a little more once they had drained.

Next, scrape them into a small bowl.  See how they are still juicy around the edges?  This is good!

 Next we'll do the green onions.  Take three and wash them.  Cut off the very end where the roots come out and about 3 inches or so above that.  Discard both ends and keep the middle.

 We want the green onions finely chopped, and since I don't have a food processor that will do it for me, I start by slicing each green onion down the middle.

 Next I take my knife and cut off slices about 1-2 mm thick.  Voila - we have finely chopped green onion to add to the bowl!

 Now let's move on to the cilantro.  Pick off about 40-50 leaves and chop roughly on the cutting board.  You're done!  Add it to the bowl.

 For the jalapeno peppers, you will start by slicing them down the middle and "seeding" them, which is an easy way of saying cut out the middle parts and keep the outside.  If you're a sissy about spicy stuff like I am, you want to make sure you keep the seeds out of the bowl, so once I have seeded them I rinse them with water to get all the random seeds off of the outer part.

 Next, cut each half into skinny slices.  As you can see, my half was cut into about 8 pieces, which is pretty slim!

 And then we're going to chop each bunch of slices into small pieces, just like the onion only slightly bigger.  And we have... finely chopped jalapenos.  Fancy, eh?

 Once you've added the green onion, cilantro, and jalapeno to the bowl you can also toss in your garlic powder, salt, and lime juice.

 Mix well.
Looks pretty, right?
Well, we're not done yet!

 The reason I have added the avocado last is because you don't want to add it right away unless you're serving this the same day.  A plain avocado will turn brown once it's exposed to the air - kind of like a banana - so unless I'm eating this the day I make it, I won't add it in just yet.  However, when you get ready, here's how you chop that avocado without making a mess.

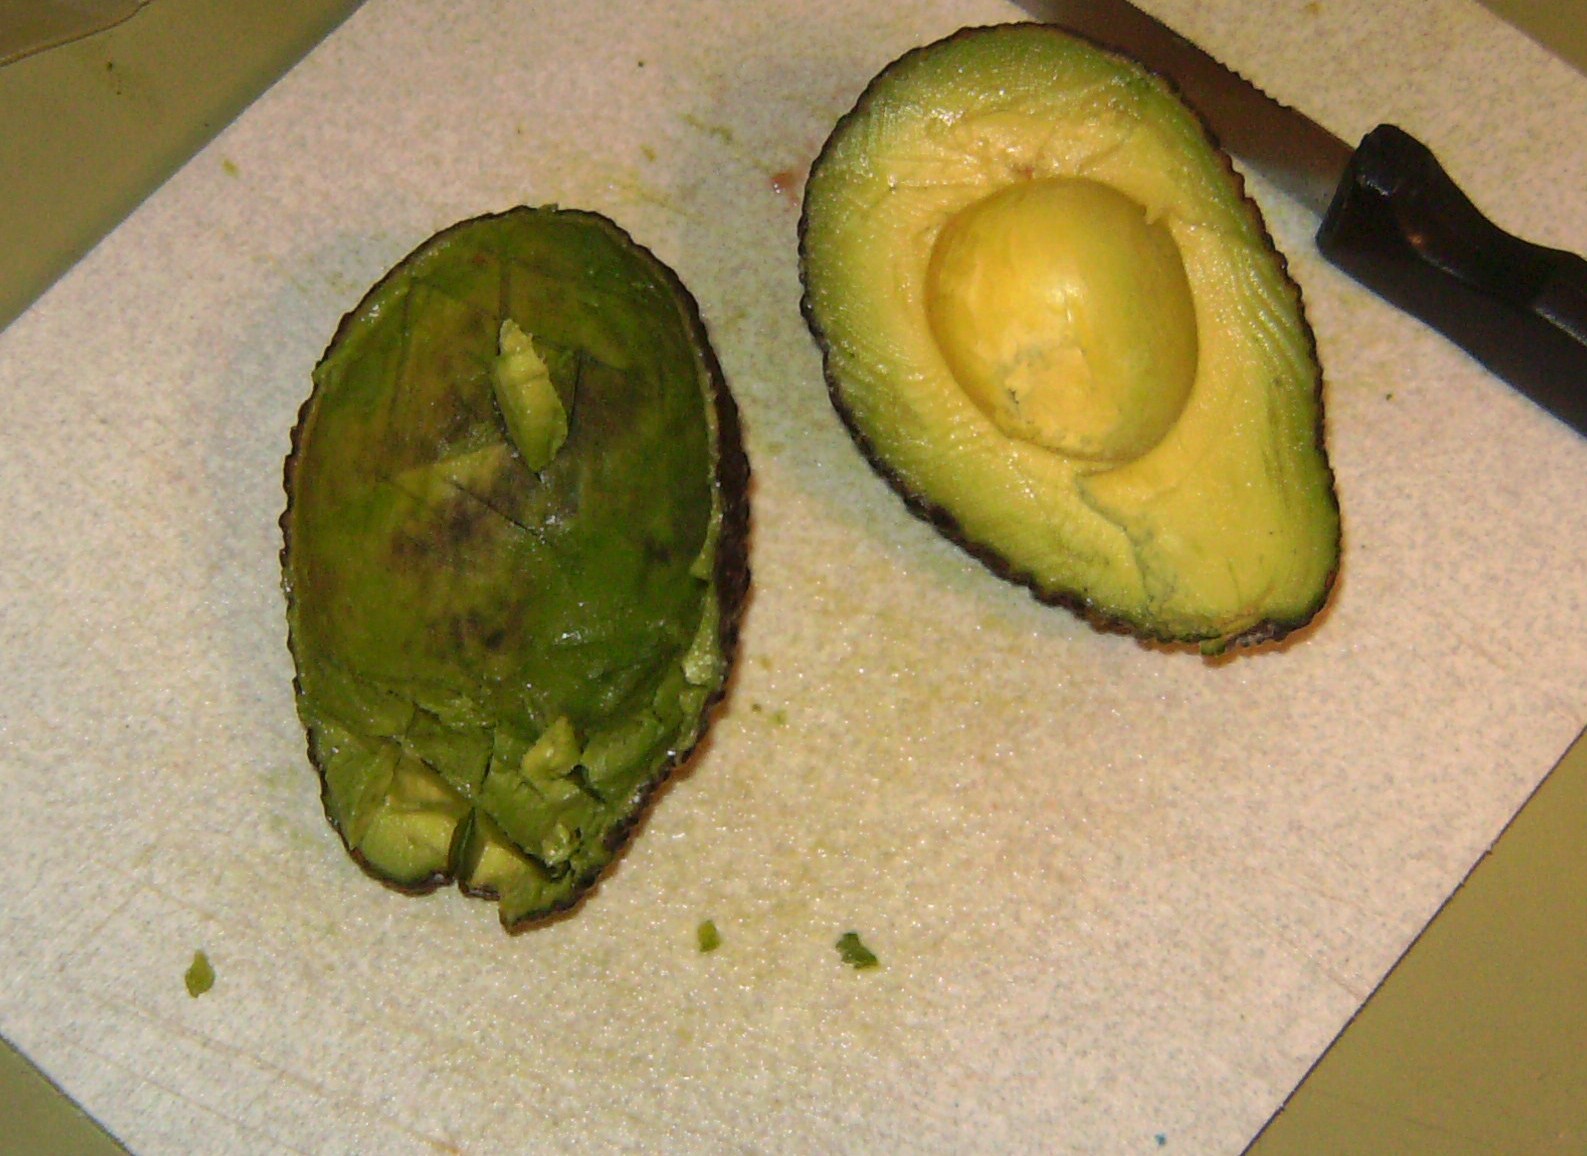
First, cut the avocado in half lengthwise and remove the pit.  Then, using a small knife, cut the avocado flesh into small cubes, being careful not to cut all the way through the skin of the avocado.  What you see should look something like this:

 Next you're going to take a large soup spoon and scrape it along the inside of the avocado peel.  This will scoop that diced avocado right out of the peel and into the bowl...

 ... leaving you with an empty skin.

 Mix in the avocado and you're done! 

Now.  Here's where it get's tricky.  You're supposed to let things like this sit for about 30 minutes or so before you eat them so the flavors will "marry" properly.  If you think you can wait, you go right ahead.  But me?  I usually go ahead and start eating this stuff right away with my tortilla chips.  It's also a great topping to put on your tacos, nachos, or any other Mexican dish.


Saturday, April 10, 2010

Garlic Mashed Potatoes

As promised, here is my recipe for Garlic Mashed Potatoes.  I actually don't get to make them very often since my kids prefer potatoes of the oven roasted variety, but The Honey and I love these.  In fact, I'm kind of a mashed potato snob.  I really (and I do mean really) don't like instant mashed potatoes.  And although it takes a slightly longer time to make regular mashed potatoes, it's totally worth the investment.  Trust me.

As an added bonus to this recipe, it's going to roll into the next one - we're going to save our water from boiling the potatoes and turn it into the softest bread you have ever had.  So be prepared!

Garlic Mashed Potatoes

4 red potatoes
1/4 c. light butter spread
2-4 Tbsp. milk
1/4 c. light sour cream
salt/pepper to taste
1 clove minced garlic OR garlic powder

Scrub and dice red potatoes.  If desired, you can peel them, but I prefer to leave the skins on.  In this case, the potatoes were old enough that by the time I finished cutting off the blemishes they were half-peeled anyway.  After you've diced the potatoes, place them into about 5-6 cups of boiling water.  Boil for about 15-20 minutes, or until potatoes are tender.

When potatoes are finished, remove from water with a slotted spoon, keeping the water in the pan for future use - we're making bread, remember!

Place potatoes in a medium bowl and mash slightly with a fork.

Add remaining ingredients and mix well with a spoon.  If you prefer no lumps in your mashed potatoes, use a kitchen mixer.

Tip #1: 
 You can adjust the amount of milk you add to make the potatoes thicker if you desire. I prefer thicker mashed potatoes, so I only add the lesser amount of milk. If you aren't sure, start with 2 tablespoons and add a little more at a time till potatoes are the desired consistency.

Tip #2:
If you've never made garlic mashed potatoes before and aren't sure how much you are "into" garlicky stuff, I recommend using garlic powder your first time around.  After you have added your desired salt/pepper, add about 1/4 tsp. of garlic powder at a time, mix and taste.  If you like it, stop.  If you want it more garlicky, add a little more.  Fresh minced garlic can be very strong if you aren't careful or you have a large clove and if you aren't used to garlic, you may want to opt for the safer bet of the garlic powder.

The end result?  Umm, umm, good!


Monday, November 16, 2009

Roasted Potatoes

Several months ago I had these fantastic roasted potatoes at a friend's house. Because I am the Candid Cook and lover of all things edible, I asked her for her recipe. I was floored when she said that all she used for seasoning was the Good Seasons Italian dressing mix packet. Another friend that was there said she used it to season everything, too. What?! How did I miss that memo?

That's when I bought my first package. I even bought the starter kit that came with a shaker bottle and two packets of seasoning. I used it to make a marinade for chicken and veggie shish-ka-bobs, and I was hooked! Not only is it a cheaper and better way to make salad dressing, but as I had already been told, I could also use the seasoning packet to roast potatoes.

One of my favorite things about this recipe is how stinkin' easy it is. You don't even have to peel the potatoes. You just scrub, chop, season, and bake. My second favorite thing about this recipe is that for the FIRST TIME (not counting french fries) Horse Lover has not only liked to eat potatoes, but she has asked me to make them. With the skins, no less. Do you hear the choirs of heavenly angels singing? I do!


Roasted Potatoes

4 Russet potatoes or 6 red potatoes
1 package Good Seasons Italian dressing mix
2 Tbsp. olive oil

Scrub and chop potatoes into bite-size pieces. Add 1 packet of Italian dressing mix. Toss lightly to coat the potatoes. Drizzle a olive oil and toss again to coat.
Line a 13x9-inch pan with aluminum foil. Coat with non-stick cooking spray. Pour potatoes into pan. What you see pictured here is only 2 russet potatoes (I made a half-batch!), so your pan should look a bit fuller than mine does.
Bake at about 425 to 450 until potatoes are cooked through. Be sure and stir gently about half-way through. The length of time you need will vary based on how full your pan is and how large your potato dices are. I cooked mine about 30-35 minutes.

Thursday, November 5, 2009

Shortcut Potatoes

It may come as a surprise to you, but sometimes I forget to do things when I'm cooking. Take Monday night for example. We were having an easy night of it with some grilled hot dogs (the light ones, but don't tell the kids!) and corn and I thought the natives would enjoy some baked oven fries with their dinner, too. But I was so excited about grilling the corn that I completely forgot about the fries.

So picture it: it's 6:05, The Honey will be home in 15 minutes, and we're already having a late dinner. I'm NOT going to start some oven fries that will take 25 minutes alone just to cook. However, I knew we had our hearts set on crispy potatoes, so I devised a plan.


Shortcut Potatoes

potatoes
Cooking spray
salt


Scrub and slice potatoes and place them in a microwave-safe dish. Add a little water and cook them in the microwave until tender. (For 2 potatoes it's about 4-5 minutes.)

Preheat oven to broil and cover a cookie sheet with parchment paper. Place potatoes down in a single layer. Coat tops with cooking spray and sprinkle with salt.

Broil until the tops are starting to brown - about 3 minutes. Turn potatoes over, coat with additional cooking spray, and salt. Broil until other side is done.

Wednesday, October 7, 2009

Garlic Asparagus

Once upon a time, this dish was loved by Horse Lover. Unfortunately, I haven't made it in a while and now she's decided she doesn't like asparagus. Figures. However, I will continue to persevere and make it from time to time. It was thoroughly enjoyed by The Honey, Handsome Man, and me!

If you fall into the same category as Horse Lover and The Monkey (i.e. you don't like asparagus), I feel your pain. For a long time I didn't think that I liked asparagus, either. This probably had something to do with the fact that the only asparagus I had was that canned asparagus - nasty, slimy, squishy stuff. No way, Jose'. All of that changed the day I first tried some fresh asparagus. Ooh, la la! It was lightly crisp, tasty, and I could pick it up with my fingers and eat it. This is the way asparagus should be.


Garlic Asparagus
(This entire recipe is only about 250 calories! Makes about 4 servings of less than 65 calories each.)

1 lb fresh asparagus
1 Tbsp olive oil
2 cloves garlic
Salt/pepper to taste
2 Tbsp shredded Parmesan cheese
Paprika

Wash asparagus, and break off woody portion of the stem. It should snap off easily in your hands.
Place asparagus spears in a microwavable dish, along with 2 Tbsp of water. (I use a glass pie plate - works great for me!) Cover with plastic wrap and steam in the microwave for about 4 1/2 minutes, stirring once during cooking. (Note: you do not want to cook your asparagus all the way in the microwave. Remember, you're going to continue cooking it on the stove for a few minutes, and you don't want it to be overdone!)
Remove asparagus from microwave and drain. Heat oil and garlic in a skillet, and add steamed asparagus. Sprinkle with Nature's Seasons (or salt/pepper).
Saute over medium heat for about 3 minutes, stirring gently to lightly coat asparagus in garlic and oil.
Return asparagus to baking dish and sprinkle with Parmesan cheese and paprika. Bake at 375 degrees for about 5 minutes, or until cheese is melted.
OR
Leave in the pan and sprinkle with Parmesan and paprika. Cover and let cook without stirring for another minute or two until cheese is melted.

Sunday, June 7, 2009

Stovetop Mac & Cheese

This is another one of those recipes that really isn't low-fat or low-calorie, but sometimes you just need to make it as a side dish with an otherwise healthy meal. Sometimes I'll toss in some cooked peas or chopped broccoli with it just to make me feel better about serving it, but Horse Lover and The Monkey love it best veggie-free.


Stovetop Mac & Cheese


12-14 oz. small pasta noodles (my favorite is rotini or shells)
1 Tbsp butter or margerine
1/2 c. milk
2 c. shredded sharp cheddar
1/3 c. light sour cream
Salt/pepper to taste
1 tsp dried dill weed (optional)

Cook pasta on stovetop according to directions on box.


Drain and immediately return to hot pot. Over medium heat, add butter and milk and stir until butter is melted.


Add shredded cheese and stir until cheese is starting to melt.


Mixture will look slightly clumpy at this point, but don't worry - the sour cream will smooth it all out!


Add sour cream and still until well combined.


Season with salt/pepper and dill weed if desired. If too thick, add a little more milk or sour cream until the consistency is as you like it. Serve and enjoy!


Tip: If adding peas or broccoli, you may want to add a little more cheese to make sure there's enough cheesiness for both noodles and veggies.
Blog Widget by LinkWithin