Saturday, November 13, 2010

Balsamic Chicken with Mushrooms

Last month at church we had a kind of recipe swap night where we all brought our five best "go to" recipes.  Since I hadn't gone into labor yet (despite it being the night before my due date!) I went to the activity and came home with dozens of new recipes to try.  Exciting, isn't it??

Now, here we are 4 weeks after I've had the baby and I've finally had the chance to try out some of these new recipes!  One of the first I had to try was this scrumptious looking recipe for Basalmic Chicken. I got it from my friend Maria, along with the note that it's her and husband's favorite Weight Watchers Recipe.  I'm not sure who gets the credit, but KUDOS to them!  It was fantastic!  My favorite part is actually the mushrooms because they absorb so much flavor.  I could have skipped the chicken and eaten piles of the mushrooms.

Balsamic Chicken with Mushrooms

3 Tbsp balsamic vinegar, divided
2 tsp Dijon mustard
1 large garlic, minced or crushed
1 lb. boneless, skinless chicken breasts
8 oz. button mushrooms, halved or quartered
1/3 c. chicken broth
1/2 tsp dried thyme, crumbled

Cut your chicken breasts into 4-oz portions (about the size of your palm).  I had one really large breast and one average-sized, so I ended up with 5 pieces instead of 4.

Preheat a medium-sized pan on the stove.  Coat with non-stick cooking spray.  Mix together 2 Tbsp of the balsamic vinegar, the garlic, and the mustard.  This is your marinade.  Coat the chicken in the marinade and place in the pan.  Pour any remaining marinade into the pan as well.

Cook until chicken is done.  If all of the liquid cooks out of the pan, you may need to add a couple of tablespoons of water to keep the sauce from burning.

While chicken is cooking, prepare the mushrooms.  In a small bowl or measuring cup, combine the remaining tablespoon of balsamic vinegar, chicken broth, and thyme
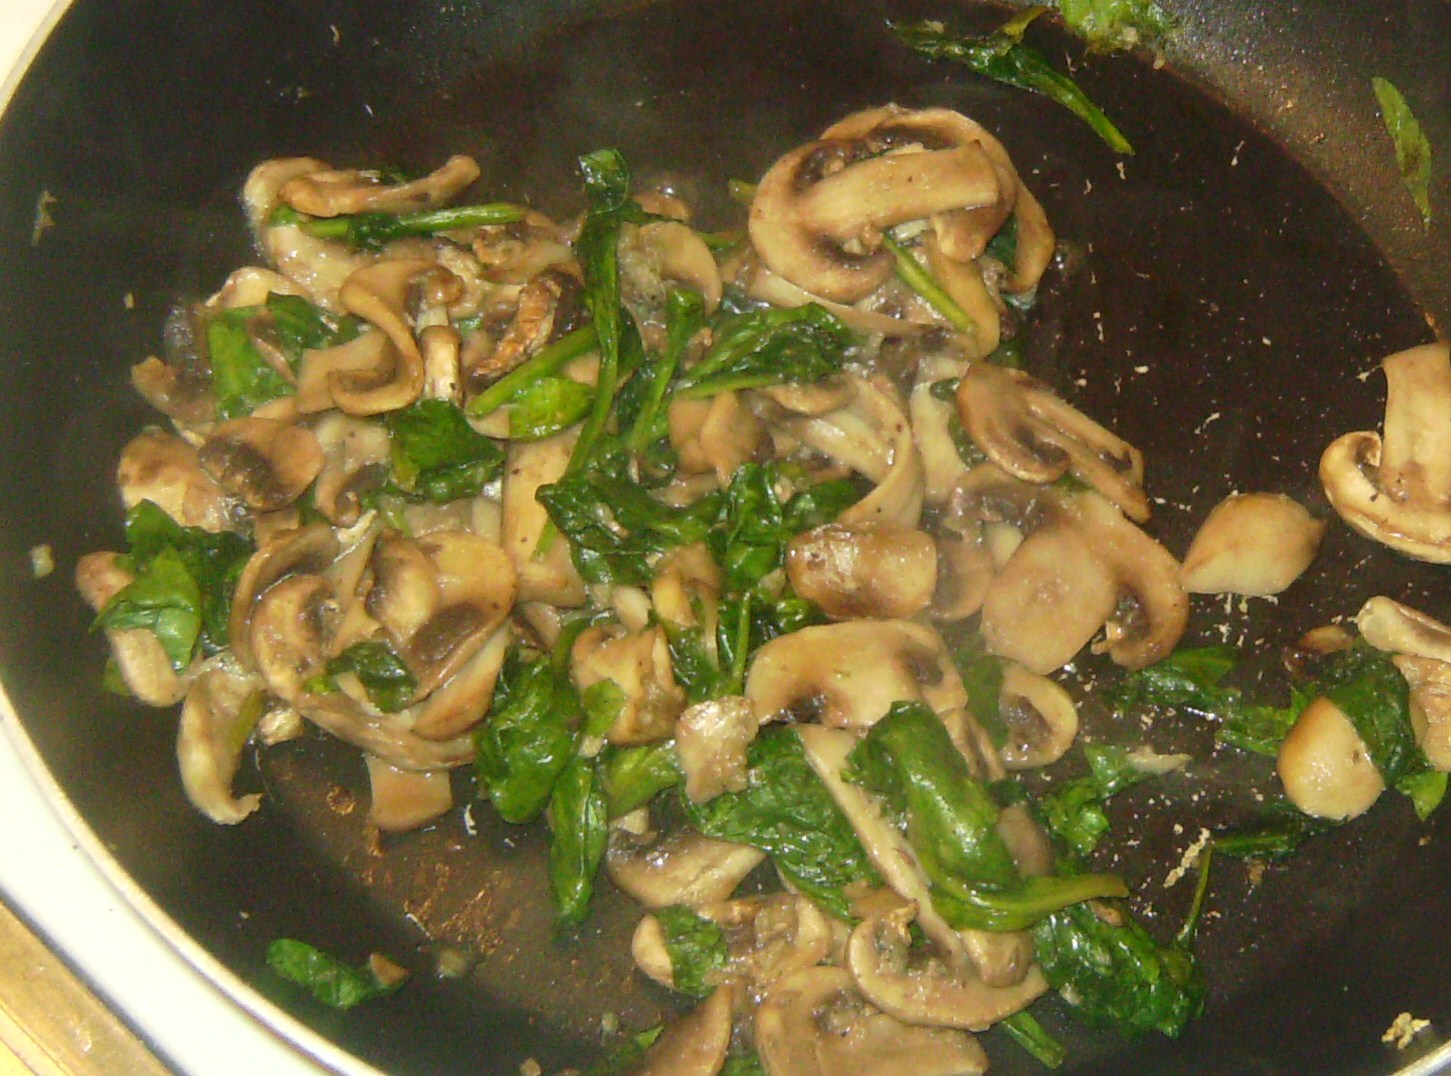
After chicken is done cooking, remove from pan and place in a covered container to keep warm.  Do not clean out the pan.  It will add more flavor to your mushrooms!  This is what mine looked like.

Into this pan, I poured the broth mixture and the mushrooms.

Then I cooked the mushrooms until they were done.  You can tell mushrooms are done by their darker color and the fact that they have shrunk down in size.  If you aren't sure, eat one.  This is my favorite method in testing for "done-ness"!

Serve the chicken with the mushrooms on top, or (in my house) without the mushrooms for the kiddos.

Either way, it is a flavorful, low-calorie dish!


Friday, October 8, 2010

Creamy Spinach & Chicken Pasta

I can't believe how long it has been since I posted!  Contrary to how it may appear, I have been doing some cooking lately.  But I will confess, it was so stinking HOT here this summer that I didn't cook nearly as much as I normally do.  We had about 6 weeks in a row where it was over 100 degrees almost every day.  In case you were wondering, this really doesn't mix well with being pregnant.

However, this tasty little concoction came from one of those nights in early summer where I didn't mind a little extra heat from my stove.  I had spinach and mushrooms that needed to be eaten along with some leftover grilled chicken, and I knew I could come up with something.  So I got to work.  The original recipe only made 2 one-cup servings, so I doubled it for your benefit.  Just remember that what you see pictured cooking is only half the recipe!


Creamy Spinach & Chicken Pasta


2 Tbsp olive oil
8 oz. button mushrooms, sliced
3-4 cloves minced garlic 

3 c. fresh spinach
2 heaping Tbsp cornstarch
1 1/2 c. low-fat cottage cheese, pureed in blender
1 c. low-fat milk
3 tsp. dried basil or 3 Tbsp fresh basil  
salt/pepper to taste
1/2 c. shredded parmesan (not grated!!)
2-3 large chicken breasts, grilled and diced
4 c. cooked pasta

Heat olive oil in a large pan.  Add mushrooms and garlic.  Saute for about 5-10 minutes or until mushrooms are done.

While mushrooms are cooking, you want to prep two other things.  First, you want to roughly chop the fresh spinach.

The second thing you need to do is pull out your blender or food processor and puree that cottage cheese with the milk.  You don't want lumpy sauce.  Trust me.
Eventually your mushrooms will be done and look something like this:

Add spinach and cook another minute or two until spinach is wilted.  (Tip: If you're using fresh basil in this recipe, this may be a good time to add that, too.)

It should look something like this when you're ready to move on:

 Sprinkle corn starch over pan and toss to let the moisture in the pan absorb it.

Pour in your milk and cottage cheese mixture and simmer until thickened.

Add Parmesan cheese, salt/pepper to taste, and dried basil.  This is when you want to make sure you're tasting this dish and have the seasonings the way you like it.

 Add diced chicken and mix well.

 Doesn't this look divine??
 
Serve 1 cup of sauce over 1 cup of pasta for a very filling meal!


Wednesday, June 30, 2010

Lasagna Pizza Rolls

I'm sure that someone, somewhere has tried something like this before.  But since I haven't ever seen it before, I feel like a culinary genius.  And my kids think so, too, which is even better.

It seems to me there's a quote somewhere about desperation leading to innovation leading to inspiration.  This was something like that.  It was a Thursday, and I wasn't planning on going to the grocery store till that night or the next day.  My kids were complaining about sandwiches for lunch (again!) and my 6-year old started begging for me to take everyone out to eat.  Since this is something she actually does on a regular basis, I left the room for a few minutes to think.  I realized that when I have cheese in the house (and I did), then I can almost always come up with something the kids will eat and enjoy.  So I came back and started scrounging through my pantry and cabinets to see what I could throw together. 

That's when it caught my eye.  A half-used box of lasagna noodles?  Surely there's something I could do with that.  And there was...

It was so surprisingly good, that the kids begged for me to make it again and soon.  So I made it the next night for The Honey to serve the kids (I had a meeting) and got more rave reviews.  It's quickly become a fast favorite around here!


Lasagna Pizza Rolls

Lasagna noodles (any kind)
Shredded mozzarella cheese, or blend of cheeses
Pepperoni, or other favorite pizza toppings (optional)
Italian-style diced tomatoes (pureed in blender)
     OR pizza sauce

Take your lasagna noodles and break them in half.  You can use oven-ready or regular noodles, it doesn't matter.

As you can see from the first time I did it, it's hard to break them in a straight line just using your hands.  However, I discovered the second time around that if you use the straight edge of the counter top and break the noodles over that, you get a nice, clean break every time.  You'll see evidence of this in later pictures.

Place halved noodles in a medium to large pot of boiling water and boil for 10 minutes.  (Hint: Do not stir the noodles too much while cooking.  They will start to fall apart.  Just stir them enough to keep them from sticking to the pan.)

Drain and rinse with cold water.

Spread a sheet of aluminum foil out on the counter, and line up as many lasagna noodles as you can in straight rows.

Next, sprinkle on desired amount of cheese and add any pizza toppings you like, such as pepperoni, sausage, or sauteed veggies.

Starting at one end, roll each noodle up individually and place in a greased rectangular casserole dish.

Continue until all the noodles have been rolled up.

Top with pizza sauce or pureed Italian-style diced tomatoes.  Don't drown them with sauce, just spread a nice layer over the top.

Then sprinkle with additional cheese.  As you can see, for this batch we used mozzarella in the middle and mixed cheese for the top.  Fabulous.

Cover with foil and bake at 350 degrees for 30 minutes.  Remove the foil half-way through the baking time to get your cheese nicely browned like you see here.

CAUTION: You're kids may want to eat more of this than you think they will, so be sure to supplement this tasty dish with a nice, green salad!  Then your husband won't scold you for not making enough...


Blog Widget by LinkWithin