Saturday, August 27, 2011

Zucchini-Beef Tacos

So what do you do when you have a fridge full of zucchini, kids that don't want to eat it as a side dish, and a desire to not bake it into desserts and zucchini bread?


You stick it in everything else you can think of, of course!

This actually turned out really good, and the kiddos just ate it right up as if it were regular beefy taco meat.  (Which actually means that my meat-eaters liked it and my non-meat eaters wouldn't touch it because they don't eat beef...)

So how did I do it?  There's no recipe here because I know you can handle this one without it.  It's really hard to screw up.

First you start to cook your ground beef (or turkey) just like you would any other day you were making tacos.  If you like to add a little onion or garlic, add it in.  Just cook it like usual.  Then, when there's just a little pink left in the meat, dump in the grated zucchini.  (Hint: If your ground beef/turkey is fatty and there's a lot of grease in the pan, drain your meat before adding in the zucchini.)

Then you mix it up and keep cooking.  What you see pictured here is a little over 1/2 lb. of ground beef and one medium zucchini, grated.

Cook until the meat is no longer pink, then add in your usual taco seasoning and water.

Cook and stir until the extra water has cooked out, then serve in tacos, taco salads, or whatever you normally use the taco meat for.   It's excellent!


Monday, August 15, 2011

Scattered Hash Browns

One of my favorite things in the world when I was in college was Waffle House hash browns - scattered, covered, chunked and diced.  And if you don't know what I mean, you are obviously a Yankee not from around these parts.

The funny thing is. I'm a Yankee, too.  In my case I was transplanted young and grew up liking some of those things that southerners do.  Like Waffle House hash browns, for example.

So anyway, I have recently realized I have a plethora of potatoes in my cupboard.  I'm part of a produce co-op and get potatoes regularly, but I haven't been using them.  For one thing, my kids don't usually like potatoes, and for another, it's been too hot to actually cook.  Last night I decided it was time to use up some of my spuds.  Since I was cooking 2 other things for dinner that my kiddos don't like (beef and broccoli), I tried to think of a way to prepare them that my kids would like.  I really do try to have at least one thing on the table that they will eat.  And you know what?  We had success!  And it wasn't actually that hard, OR that greasy.

One more thing before I get started.  I highly recommend using an electric griddle to make these.  You can do a smaller amount in a non-stick frying pan, but I found it much, much easier to do this on the non-stick, electric griddle.


Scattered Hash Browns

5 smallish russet potatoes
1 onion
olive oil
salt/pepper to taste

Wash and trim your potatoes.  Do not peel.

Grate the potatoes and onion, and place in a colander.  (Forgot to get a picture of this step, but I'm sure you can figure it out!)  Place in the sink and rinse with cool water.

 Cover a cookie sheet with paper towels, and spread the hash browns evenly.  Blot dry using another paper towel on top.

 Sprinkle the hash browns with salt/pepper, and drizzle with olive oil.  Toss together to mix lightly.

Spread the hash browns in a thin layer on a pre-heated electric skillet.  I set mine on 350, and also sprayed it with non-stick cooking spray - just for good measure.

 When the hash browns start looking crispy on the bottom, go ahead and flip.

You'll need to do this a couple more times until the hash browns finish cooking.  If they aren't getting crispy enough for your taste, go back and drizzle a little more olive oil over the potatoes.

Eventually you'll end up with a little piece of heaven that looks like this:

And even though I didn't cover, chunk or dice them (remember the picky kids...), we all thought they were delicious.  This is definitely going to get a repeat performance in this house.

So how do you like your hash browns?


Saturday, July 30, 2011

Let's Stick Together Breakfast Burrito

I love breakfast burritos.  I love the peppers, onion, tomato, eggs, sausage and cheese all rolled in to one big, soft tortilla.

I hate it when I'm eating my breakfast burrito and all the good stuff starts falling out when I take a bite.  I really don't like getting tomato or sausage in my lap.

The solution?  A "Let's Stick Together Breakfast Burrito".  Nothing falls out, everything stays in, and it's one yummy, fluffy breakfast!  (Though if you use salsa, it might still drip a little so be sure to eat over your plate.)

"Let's Stick Together" Breakfast Burrito
I haven't included amounts for this recipe because you'll want to make it to your taste, and the amounts will changed based on how many people you're cooking for.  You can leave stuff out, put other stuff in, etc.  The pictures show amounts that make one really large burrito.

Olive oil
Onion, diced
Pepper, diced
Minced garlic
Fresh tomato, diced
Breakfast sausage, cooked and crumbled
Eggs
Salt/Pepper to taste


Preheat a little olive oil in a skillet.  Add diced onion, peppers, and a little minced garlic.  Saute until onion starts to look translucent.

Add diced tomato and cooked sausage, and cook for another minute or two until they are heated through.


Meanwhile, beat your eggs with a fork and add a little salt/pepper to taste.

When the sausage and tomato are warm, add the egg to the skillet.  Lift the veggies to make sure the egg covers the bottom of the skillet.

After a couple of minutes, the egg on the bottom will be cooked; try to flip the egg mixture in sections to get the uncooked egg to the bottom of the pan.  Don't try to stir this, or you'll end up with a bunch of uncooked egg, which is just nasty.  Remember: FLIP!
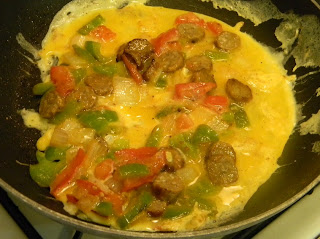
When it's done, it'll look something like this.

 Turn off the heat and let sit for another 3-5 minutes to finish cooking all the way.  If you're going to add cheese, now would be the time.  This way it melts onto the eggs so it won't fall out when you're eating.

Slap that concoction onto your tortilla and add a little salsa.  Wrap it up and enjoy every delicious, neat bite.

Need I say more?

Tuesday, March 8, 2011

Southwest Burritos

Several weeks ago I was trying to come up with a healthy, fiber-filled lunch for The Honey to take to work. He was getting tired of soups and it was too cold for salads, so I started thinking about filling a tortilla with some yumminess. I started with leftover chicken and black beans, and went from there. The result? "Blog-worthy" were the exact words used by The Honey.

I have finally made them again and tweaked my recipe to get it just right.

Southwest Burritos
(serves 6)

1 can black beans, drained and rinsed
1 c. frozen corn
½ c. instant brown rice (uncooked)
1 c. water
1 ½ c. leftover cooked chicken, chopped
½ c. roasted red bell pepper, chopped
2 Tbsp. fajita seasoning
2 Tbsp. picante sauce or salsa
½ c. shredded sharp cheddar
6 tortillas


Bring beans, corn, rice, and water to a boil in a medium saucepan and simmer, covered, until rice is done (about 10 minutes).


While this is simmering, pull out your leftover chicken. As long as it isn't BBQ chicken, it doesn't really matter how it's seasoned. I have used garlic chicken and grilled basil chicken - both are fabulous. You could also use leftovers from a roasted chicken if you have it. Just chop it up and use it!


Now set aside the chicken and chop up those roasted red peppers. I usually buy the strips so minimal chopping is required.


At this point your rice should be about finished. Remove the lid and add the chicken and peppers to the saucepan, along with the fajita seasoning and picante sauce. If you prefer, you can use salsa, but we are picante sauce fans around here.


Stir it all up and let it simmer till everything is heated through.


Now remove from heat and stir in the shredded cheese.


Spread 1/6 of filling on tortilla of your choice. This time it just so happened that we had some jalapeno tortillas lying around that my sister bought. They add a little kick if you like it spicy! If not, just use regular or whole wheat tortillas.


Roll it up like a burrito and cook for a couple minutes on each side in a medium-hot frying pan. This makes the outside of the burrito a little crunchy and helps it hold its shape better while serving and eating. (No oil or cooking spray required!)


Finally, be sure to wrap up those leftovers in foil to take for lunch! Store in the refrigerator. When reheating, simply unwrap and discard the foil. Place the burrito on a paper towel and microwave for 45 to 60 seconds.


Blog Widget by LinkWithin